
Marketing Campaign
Marketing emails are a great way to engage all or subsets of your clients with updates on the business, special events, and more.
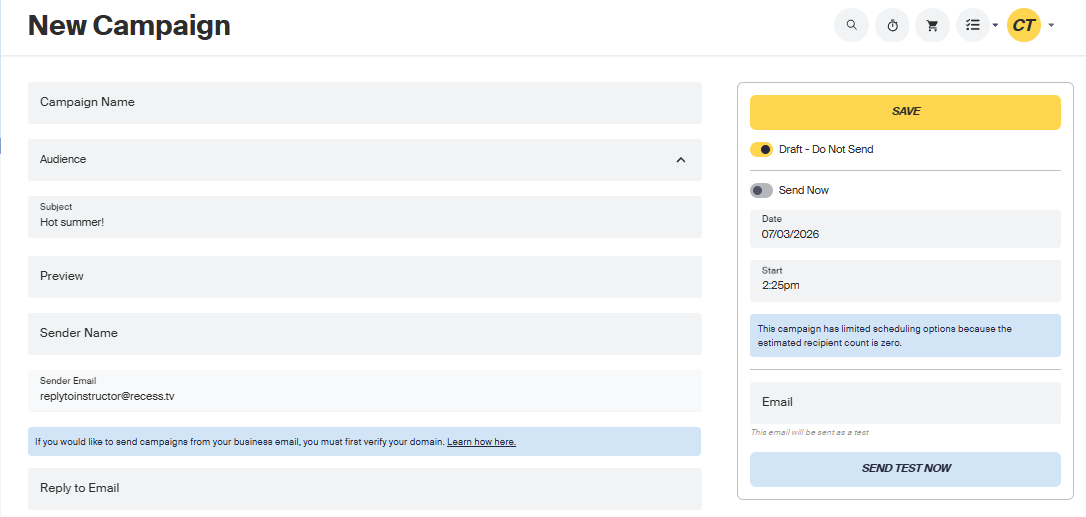
Go to the navigation menu > Growth Suite > Marketing Campaigns
Enter the following information:
- Campaign Name: This is the internal name
- Audience: Choose predefined audiences or create a custom one (help article)
- Subject: Make it fun and catchy!
- Sender Name: This is what shows up in a client's inbox
- Sender Email: the email address a client sees
- Schedule Send: Choose to send the email now or in the future
- Send a Test: Enter an email to see how the email will look
- Draft - Do not send: If you dont want to send it yet as you want to keep edtting later on
Tip: Create one marketing campaign template the first time. Then in the future, you can duplicate it to make your life easier!
Adding Preview Text
Preview text is the line clients see in their inbox right after the subject line, before they open the email. If you don't set one, the inbox pulls the first bit of text from your email, which isn't always what you want clients to see first.
- Create or open a marketing email
- Look for the Preview text box near the subject line
- Type in what you want clients to see in their inbox
- Finish your email and send or schedule as usual
A few tips:
- Keep it short; most inboxes cut it off around 40 to 90 characters
- Don't repeat the subject line; use the space to say something new
- Give clients a reason to open, like a new class, a discount, or a deadline
Example:
- Subject: New Summer Schedule is Here 🌞
- Preview: More morning classes, plus a new Saturday bootcamp starting July 12.
Building an email
When the form opens you'll see an option to choose a spacing pattern to get started. This will pre-populate how many columns you want.
Adding an Element
Once you choose an option, the left-hand nav will change to what you can insert in the columns/rows
Text Box
You can do highly formatted text from bullets to colors. You can also change the background of any cell
Spacer
This is a great way to create a divide between rows. You can change the color and height of the spacer!
Media
Upload a picture!
-
Once you upload the picture you can add a URL to it on the left
-
Hover over the picture and click on the pencil. The left hand toolbar will change so that you can align the image inside the box
Add a Button
When adding a button, you'll have some options:
- Add text and/or change the color of the text
- Change the color of the button
- To change the width of the button go to "Margin" and click the lock button to unlock it
- Then you can play around with the height and width!
- Add a URL - this is at the bottom of the left hand tool bar
- Change the background color behind the button - Hover over the button and click the pencil, just like for media
A
dd Recess Content
- You can add anything from classes to packages to gift cards!
- Click the Recess element you want to use
- Search for the item
- Choose if you want to show the name and information (it will load the image by default)
- Tip: don't add the name, instead add a cell below the item and type in the name you want to display
- Link: when the email is sent, the image will automatically be a hyperlink to the item!
- Use your skills from above to play around with the spacing inside the cell to align it, change colors, etc.